Describe the Pythagorean relationship using various geometric models, and apply the theorem to solve problems that involve an unknown side length for a right triangle.
Context
Four investigations to deepen student understanding of the Pythagorean theorem. Prior experience with the theorem is beneficial.
Students will work in small groups of four or five students.
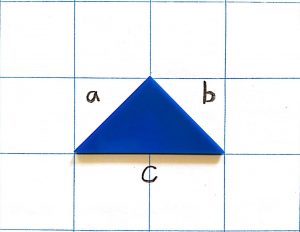
Right-angle triangle cut-out from grid chart paper (Base: four square units; Height: three square units)
Label the legs as “a” and “b”, and the hypotenuse as “c”
Square tiles (Three different colours; 25 of each)
Investigation 2
Three sets of colourful tangrams
Grid chart paper
Investigation 3
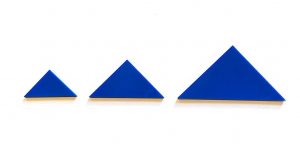
Four congruent triangles (Base: four squares; Height: three squares)
25 square tiles
Grid chart paper
Investigation 4
Objects (such as books) that are five, 10, 13, and 26 inches long, labeled with respective lengths
Ruler
Grid chart paper
Lesson
Investigation 1
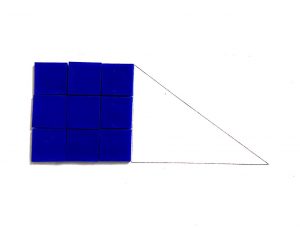
Goal: use the tiles and the triangle to prove a2+b2 = c2.
Result: the sum of the number of tiles needed to cover the squares of the legs (sides “a” and “b”) is equal to the number of tiles needed to form the square of the hypotenuse (side “c”).
Potential scaffolds:
Demonstrate how to make the first square against one of the legs.
Encourage students to superimpose a2 and b2 onto c2.
Encourage students to model the square tiles using a mathematical equation (e.g., 32 + 42 = 52).
Investigation 2
Goal: use the tangram pieces to show a2+b2 = c2.
Begin by using the smallest triangle in the tangram set, then move to the medium triangle, and finally use the large triangle. Give students a hint: They may not need all tangram pieces for every solution, but they will need to combine some pieces from all three sets of tangrams.
Result:
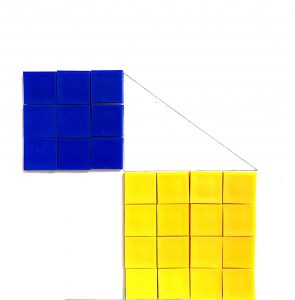
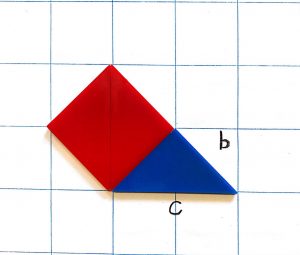
Place the smallest triangle from the tangram set in the center of the grid chart paper. Label the longest side “c” (hypotenuse) and the other two sides “a” and “b” (legs).
Create squares on the legs (sides “a” and “b”) using two small triangles for each side. Align the edge of each square against side “a” and “b” of the labelled triangle.
Trace all the pieces on the paper and then remove the squares from the legs (sides “a” and “b”) of the triangle.
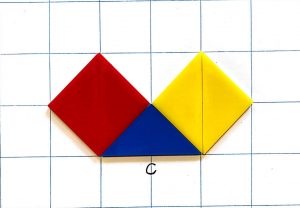
Use the same four small triangles from sides “a” and “b” combined to make one big square, whose side length is the same as side “c”.
Repeat these steps with the medium triangle and the large triangle.
Potential scaffolds:
Demonstrate how to make the first square against one of the legs.
Encourage students to superimpose a2 and b2 onto c2 using the tangrams.
Investigation 3
Goal: manipulate the four triangles to show that a2+b2 = c2.
Answer:
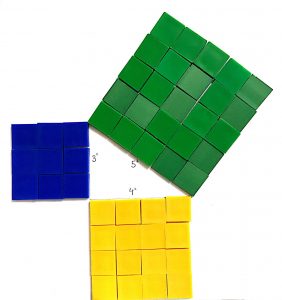
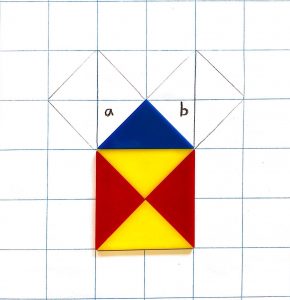
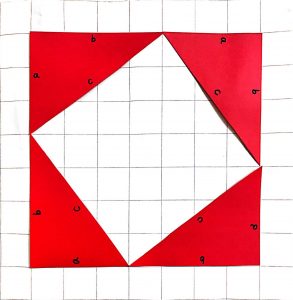
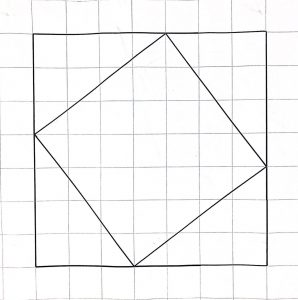
On the grid paper, place the four triangles with the hypotenuse of each triangle facing inwards, and the right angles forming the four corners of a 7 × 7 square. Trace the square formed by the outer edges of the triangle arrangement.
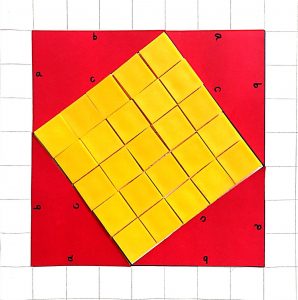
Within these four triangles, there should be a slanted square (with side lengths of five inches) that is formed in the center. Trace that square on the grid paper. This inner square represents c2.
Fill the slanted square space in the middle with square tiles. Because 25 tiles were needed, the length of the hypotenuse of each triangle is five inches (side length ‘c’).
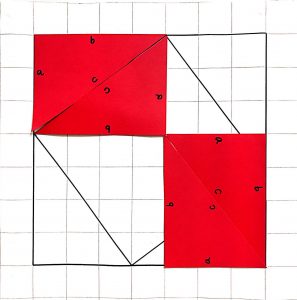
Within the larger 7 × 7 triangle, rearrange the triangles to form two distinct square empty spaces.
The smaller square is the area of a2 (blue), and the bigger square is the area of b2 (green). These are covered by the same total number of square tiles as the original square (yellow), which represents the area of c2.
Potential scaffolds:
Demonstrate how to make the first square hole by rearranging the triangles in the large 7 x 7 square.
Assist students in working backwards to calculate the length of the hypotenuse of each triangle, knowing the dimensions of side length ‘a’, ‘c’, and c2.
Investigation 4: An Extension
Goal: using different objects (such as books) that are five, 10, 13, and 26 inches long, build four “slides” so that both the height and the base of the slides are whole number lengths.
Lean the slides against a vertical surface (e.g., a wall). Record: 1) how high your slides are, and 2) how far the ends of the slides are from the base of the vertical surface.
Result:
Place the five-inch slide against the wall to create a very steep slide. Measure the height of the slide (from the base of the wall to the tip of the slide) and the length of the base (the distance between the wall and the bottom of the slide). If the numbers are not whole numbers, move the slide slightly to decrease steepness. Repeat until both measurements are whole numbers (four-inch height, three-inch base).
Repeat with the 10-inch slide (and then the eight-inch height and six-inch base).
Have students predict what the lengths of the base and height might be. Note that the triangle formed is similar to the one formed with the five-inch slide (i.e., it has the same shape and can be created by comparing it to the triangle made with the five-inch slide).
Repeat with the 13-inch slide (12-inch height, five-inch base) and the 26-inch slide (24-inch height, 10-inch base). These triangles will have a similar relationship.
Potential scaffolds:
Demonstrate how to make the first triangle by leaning the five-inch slide against the wall.
Help students adjust the slide so the base and height are whole-number measurements.
Encourage students to notice the relationship between the measurement of the slide compared to its associated base and height. For example, help students notice how changing one length of the triangle causes the other two lengths to change as well.
Look Fors
Investigation 1
Can children model the value of a2, b2 and c2 using the square tiles?
Do children understand the connection between the area of a2 and b2, and see how that equals to c2 when the square tiles from each leg “a” and “b” are superimposed onto the square of “c”?
Investigation 2
Can children model the value of a2, b2 and c2 using the tangrams?
Do children see that the number of triangles needed to create the squares for each leg of the triangle, when combined, is the perfect number to create the square for the hypotenuse?
Investigation 3
Can children model the value of a2, b2 and c2 using the square tiles?
Can children see the relationship between the empty space created at the beginning of the investigation (representing the area of c) and the empty spaces we create when we move the triangles?
Can children identify how the square formed adjacent to the hypotenuse of each of the triangles relates to the side length of the hypotenuse?
Investigation 4
Are children able to identify a pattern or relationship between their recorded measurements of the slide, and its associated base and height?
Can children make accurate predictions for the length of the base and/or height, given the length of the slide?
Do children notice that the slide will always be the longest side of the triangle?
Related Lessons
Students draw 2D/3D images to strengthen their positional and directional language.